Post Views: 495

Growing garlic is simpler than you probably imagine. The outcomes are usually satisfying and the whole process takes little time and effort. The main conditions garlic requires are sufficient sunshine, well-drained soil, proper watering, and regular weed removal.
In our comprehensive guide, you can learn all the steps you should know to grow good garlic. So, after you learn everything, you will have a tasty addition to your salad, bread, or any other meal, regardless of your level of gardening expertise.
Choose a garlic variety to grow
Before you plant your garlic, you should choose the most suitable garlic type for your garden. There are hardneck and softneck garlic varieties you can grow in the UK.
Hardneck garlic varieties
These have a more intense flavour. The following garlic types are the most common hardneck garlic varieties that you can grow in the UK:
- Chesnok Wight – This hardneck garlic variety has many advantages. It has a pleasant taste, and you can also store it easily. The Chesnok Wight can retain their shape during cooking as well. Unfortunately, it may not be as easy to find in UK as other varieties.
- Lautrec Wight – This hardneck garlic type has a delicious and medium-strong flavour. It will grow successfully in the warmer parts of the UK. The best time to plant is in autumn but you can also plant it in spring.
Softneck garlic varieties
Softneck garlic types endure longer. They produce more cloves, which are smaller than hardneck garlic varieties. Here are the most common types you can find:
- Early Purple Wight – This one matures earlier, which extends the cropping time. You should harvest this type in late May if you are located in warmer parts of the UK. For those of you who live in cooler regions, mid-June is the perfect time to plant this garlic type. The storage period is two months or so. It is advisable to plant this variety of garlic in the autumn or early winter.
- Germidour – Germidour is one of the most preferred softneck garlic types. A great advantage of this variety is that it never rots, even if you plant it in wet and damp weather. It has a typical garlic flavour, which is relatively mild. It is ideal for many cooking purposes, but when roasted whole, it outperforms most garlic types.
- Picardy Wight – Picardy Wight has strong and full taste. It is suitable to grow in most parts of the UK. It is fully grown in July and you can store it up to April the next year.
- Solent Wight – Another favourite softneck garlic variety is Solent Wight. It forms big bulbs and you can store it longer than other softneck garlic types. It can grow well in the UK climate. You can plant it either in autumn or in spring. Also, Solent Wight matures a bit later than usual and has a strong garlic flavour.
Can you grow garlic from the supermarket?
We don’t recommend growing garlic from the supermarket. There’s a potential risk that the garlic is diseased. Anyways, you can buy garlic cloves from a dedicated garden market. Another option is to choose a garlic variety which is bred exclusively for your climate.
Plant garlic at the most favourable time
If you are wondering what is the best time to plant your garlic, October to December is most suitable for autumn garlic varieties. In January, February and March, you can continue planting spring garlic varieties.
As far as how to plant your chosen variety, you can do it with a few simple steps:
- Pick the right spot – Garlic grows well in full sun. So, choose a location where there is 6 to 8 hours of sunlight.
- Prepare the soil – A few weeks before planting, prepare the soil well. To do so, you can mix in compost or old manure.
- Get the garlic bulbs – Leave the skin on and break the garlic bulbs into cloves. Ensure the cloves are big enough and free of diseases. If the clove is larger, you should expect a bigger and healthier bulb next season.
- Plant the cloves – Plant each clove at least 15cm between each other. You should plant the cloves with the root down. Place them three to four centimetres below the surface. A key to healthy growth is to ensure good drainage.
Can I grow garlic in pots?
Yes, you can grow garlic in pots. This method is very effective if you lack outside space. Also, it is suitable for those of you who have waited too long to plant garlic and the ground is frozen.
Can I grow garlic in water?
Yes, you can grow garlic in water. This is an excellent alternative if you don’t have enough garden space to grow it in soil. Similar to growing garlic in pots, this one is also not likely to produce edible bulbs. This technique works well when you want to cut off garlic greens for cooking.
What you should not plant next to garlic?
There are few plants that are negatively impacted when planted close to garlic. Garlic may stop the growth of asparagus, peas, beans, sage, and parsley. So, make sure you keep them away from it.
Garlic growing stages

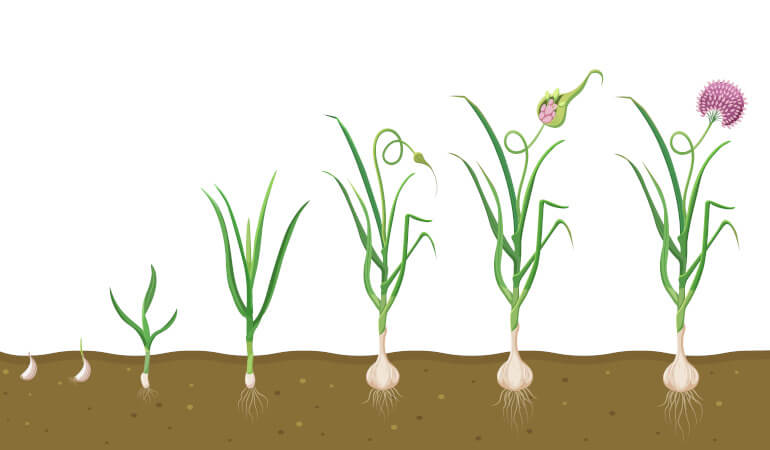
The period of time from seed to harvest will be approximately nine months on average. Garlic developing patterns are similar regardless of the type you cultivate. They include germination, green garlic, young and mature bulbs, and the flowering stage. We’ll walk you through each garlic growing stage’s particular timeframe and telltale indicators in depth in the stages that follow.
Stage 1: Germination
You can spread the seeds in the spring or autumn. It depends on the type of garlic you select. Additionally, the germination phase of garlic growth typically lasts one to two months following seed sowing. Often, as the garlic sprouts, you may notice small green leaves emerging from the ground.
Stage 2: Green garlic/spring garlic
Your garlic enters the green garlic stage about 7 months after planting. This stage is also called the spring garlic stage. By this moment, the garlic should have spread out and developed green leaves. For those of you who like their garlic soft and fresh, you can take spring garlic straight out of the ground.
Stage 3: Scapes
The scapes stage appears 3–4 weeks after the green or spring garlic stage. Scapes usually indicate that the garlic head will be ready for harvesting in a month. Garlic scapes are flower stalks found in Hardneck garlic varieties.
They are easily identified in their early stages by their sturdy and typically curling stems. They also have closed and elongated buds. These buds will expand into spherical allium flowers.
Stage 4: Young bulbs
Young or fresh garlic begins to produce a little bulb after 8 months. That’s the time when you can harvest the garlic. Plants at this stage are not fully matured yet. At this stage the garlic has moist heads with leathery skin. They will soon develop into mature garlic bulbs with characteristic papery outer layers.
Stage 5: Mature bulbs
You can harvest the mature garlic bulbs nine months after planting. You can remove the entire plant from the ground. At this point, the bulbs of the garlic should be big and completely dry. They can be a perfect addition to your everyday recipes.
Stage 6: Flowering stage
The flowering stage is the last one. It marks the end of the growing cycle. In this stage, the uncut scapes will grow into long stalks covered with tiny white bulbs.
Care tips
In April and May, you should start with watering and weeding. Regularly water your garlic during dry spells and throughout the growing season.
Avoid overhead watering. It can cause serious fungal problems. You should stop watering during the last two weeks.
When weeds grow, you need to remove them carefully by hand. As we’ve already mentioned, garlic thrives in full sun so weeds can create shady spots. Fertilise your garlic every six weeks from February. Use the sulphate of potash to provide it with all the nutrients it needs to grow healthy.
Harvesting
You will know when is the perfect time to harvest the garlic. Usually, June and July are the most appropriate months to harvest your garlic. If you harvest it early, you will miss the last growth. If you leave them for too long, the bulbs will rot in the ground.
The most common sign that your garlic is ready for harvesting is when the leaves fall over and become brown.
This is when you can start carefully digging up the bulbs with a garden fork. Ensure you don’t damage the root-plate. Lift the garlic gently and brush off any excess soil. Be careful not to lose any leaf or roots.
Store your garlic correctly
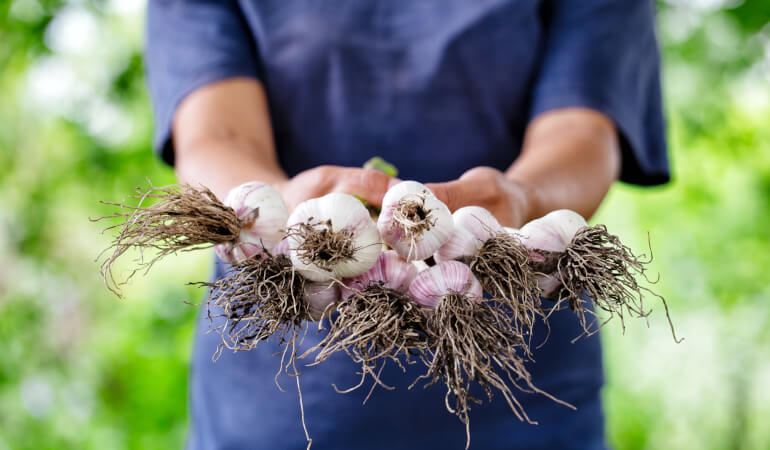
Dry your garlic in a shady, dry and airy place. It will take up to two weeks to completely dry. Tie the garlic in bunches and hang them upside down. You can also leave them on a rack. Ensure all sides are able to dry well.
The garlic bulbs will be ready to store when the wrappers are dry and papery. Also, the roots should be dry. The root crown should be hard. Another sign the bulbs are ready is when you can easily crack apart the cloves.
You can store the bulbs in a cool, dry and dark place. You can keep the garlic in the same place for several months.
Common problems to look out for
Birds
Birds will grab recently planted garlic cloves from the soil. They can also feed on germinated plants. After planting, you can cover the garlic with horticultural fleece. Leave it there until the new plants are at least 5cm tall.
Rust
You might notice small orange blisters on the leaves of your garlic. This garlic problem is known as rust. You can regularly spray the garlic with sulphur compounds.
Onion fly
The most obvious signs of onion fly presence is growth halting and thickening of the plant’s neck. Eventually, the plant dies. Usually, the onion fly lays its eggs on the plant or nearby. After the maggot hatches, it burrows into the bulb. Keep the soil well-maintained so you can protect the plant from onion flies.
Stem and bulb eelworm
Bulb eelworm is a soil-borne nematode. It usually hosts garden plants. It is necessary to remove and kill any diseased plants. Never add the affected plants to the compost in the garden. To avoid this problem again, rotate your garlic area. You may need to leave the affected area for at least three years. Don’t let anything grow there that could host these pests.
Takeaways
- Choose wisely the most suitable garlic varieties for your climate.
- Choose an area that receives a lot of sunlight.
- Prepare the soil with an appropriate compost addition.
- Water the garlic regularly until the last few weeks before harvesting.
- Remove any weed as it suppresses the growth of the garlic.
- Harvest your garlic around June or July.
- Store the garlic in a dark, dry and airy place.
